Hello Beauty Junkies!
I wanted to let you all know that I am moving my blog to Wordpress.
Come visit me from now on at
AmeliaAtSalon7.wordpress.com
![]() “Beneath the makeup and behind the smile I am just a girl who wishes for the world.”
― Marilyn Monroe
“Beneath the makeup and behind the smile I am just a girl who wishes for the world.”
― Marilyn Monroe

 Step #2: Good a good shampoo/conditioner that nourishes and replenishes and is aimed towards curly hair
 Step #3: Find a styling product that works for your curly hair type
 If you are opting for a natural route after years of heat styling, you need to replenish the moisture in your hair. Damage causes breakage and breakage causes frizz so you want to avoid damage to your hair as much as possible. Treat yourself once a week to a face mask and a deep conditioner while taking a bubble bath while you unwind. Your skin, hair and mind will thank you! Stress is no good for your skin or hair so RELAX, drink a yummy drink and enjoy yourself. When I ordered my last shipment of Miss Jessie's product, I purchased a small jar of their Super Sweetback Treatment made for those wanting to grow out their hair. It smells like banana Laffy Taffy (which I LOVE!) and is thick and creamy so you don't have to worry about it dripping while you leave it on for 30 minutes. Just like their styling products, Miss Jessie's also has a deep conditioner for every curly hair type!
 Things You Need:
 Step 3: Paint the handle of the brush with ModPodge and try to distribute it as evenly as possible. Avoid using a thick coat.
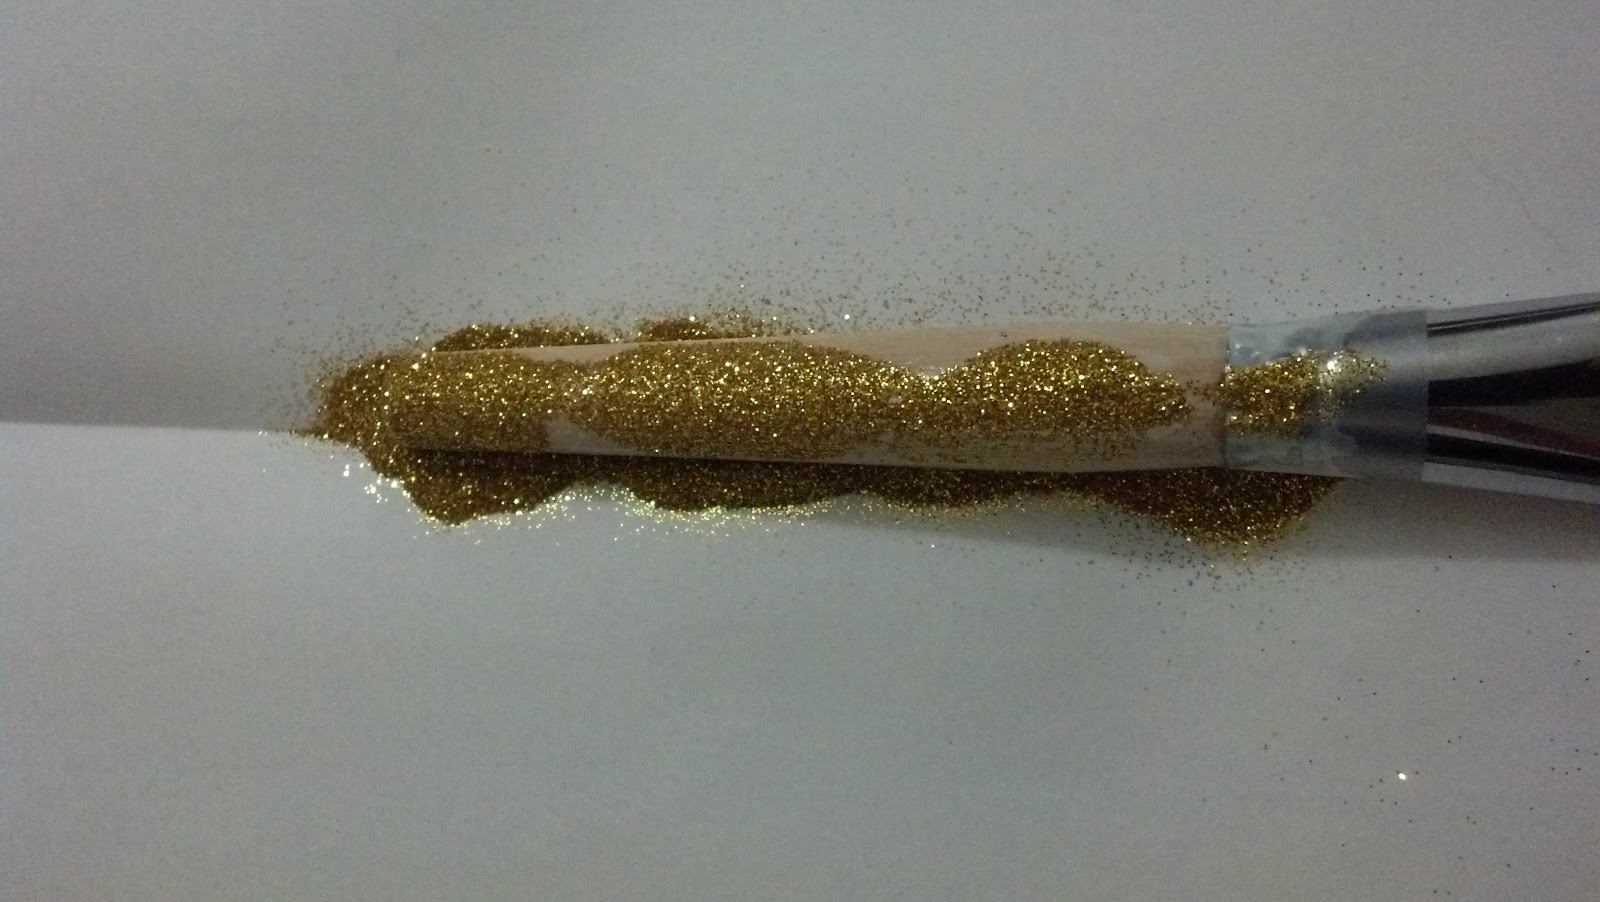


 After a few years, I went on a huge Sephora shopping spree and decided to purchase a $19 Shu Uemura eyelash curler after reading RAVE reviews. I was super excited and got all this hope.... only to have it crash down once again. While this curler didn't pinch my eyelids like every other and fit the whole length of my lash line, I could not get a natural curl that would hold. I tried everything from $20 curling mascaras to heating my curler with my hair dyer and after nothing worked, I almost returned it.
  The best and most coveted curler in the "industry" is the Shu Uemura eyelash curler pictured above. The bummer is not too long ago, Shu Uemura pulled all its products from U.S. shelves but you can still order it at http://www.shuuemura-usa.com/. It comes with two silicone pads that should be replaced after about 3 months or when you notice them wearing down. Shu Uemura does not sell replacement pads for its eyelash curler because you are supposed to purchase a new curler after the two pads wear down for hygienic reasons. However.... if buying a new curler doesn't fit your budget or you just don't want to by a new curler, the replacement pads for the Shiseido eyelash curler ($6 for two) fit in the Shu Uemura and give you pretty comparable results. I've had my Shu Uemura for several years and have had no experience in the curler itself wearing down, just the pads. I do disinfect my curler the best I can, but I should probably be a good esthetician and purchase a new one for myself.

 I enjoy many high end products and if my budget permits, will insist on using them. However, mascara is one product where I enjoy the drugstore formulas more than the high end formulas. I've tried many high end formulas including Buxom, Tarte and Bad Gal and while they weren't terrible products, I didn't feel I was getting a big enough difference to spend $15-$25 dollars on a product I use pretty much every day. Both the Buxom and Bad Gal brushes were too big for my eye shape. I couldn't open my eyes wide enough to coat the last from root to tip. I liked the Tarte "Lights, Camera, Lashes" formula, but even the waterproof formula smeared a bit by the end of the day and wouldn't hold my curl.
 After buying and returning several high end mascaras, I ended up going back to a brand I used back in high school... good old Maybelline. I purchased Full N Soft waterproof formula and Define-A-Lash waterproof formula and tested away! Both of these mascaras are great at holding my curl and are pretty smear proof, even through tears. I feel the Full N Soft adds volume with its thick, round brush and Define-A-Lash separates and adds length. They are also less expensive which can make a huge difference in your budget for everyday cosmetics.
 My topic for this post is the annoying pest known as gifted body wash/bubble bath. I am incredibly grateful to receive any present, but gifted body wash has begun to irritate me over the years. Most women love wonderful smelling items so for many people its a fail safe when purchasing gifts for females you aren't necessarily close to. There is an exception... if a female you know LOVES a certain body wash and you know that for sure, then by all means it's an awesome gift. However, if you aren't very close/personal, step away from the body wash. Every Christmas, I would put the body washes I accumulated that holiday in my linen closet, saying I would use them one day. Lo and behold I would forget about their existence until the next time I moved and once again I would say "I'll use it one day" and "one day" never came.
  I enjoy scented body wash, however I prefer to use Dove bar soap because of the way it moisturizes my skin. It has a soft fresh scent that I enjoy, it leaves my skin moisturized so I don't have to apply lotion and its inexpensive. Anyway, after storing body wash after body wash away while using my Dove soap I realized I was accumulating a body wash hoard hahaha. In the past few months I made a dedication to use EVERY body wash/soap in my linen closet before purchasing more Dove soap... it's been about four-five months and I have about four left! LOL if you know me personally and you are reading this post:

 You can purchase body scrubs in most retail stores that sell body wash for decent prices. If you are purchasing them for more than just a couple of people it may be more cost effective to make the scrubs yourself. This involves a carrier oil (almond, grapeseed, hazelnut, ect.), a sugar/salt (brown sugar, organic sugar, Epsom salt, ect.) and your choice of essential oils. You can add fun elements to your scrubs like crushed candy cane, sprinkles, dried flowers, ect. to give them a personal touch. There will be another post entirely dedicated to making your own body scrubs so stay tuned! If you can't wait until then, do a search for DIY body scrubs on Pinterest... there are hundreds of recipes out there!
  I purchased the Urban Decay Lash Kit which came with a set of UDs false lashes in Minx, a small tube of Urban Lash False Lash Mascara, a small 24/7 pencil liner in zero (black) and some lash adhesive. The lashes are very pretty outwards swooping lashes rather than curled upward. This gives them a feathery look. The quality of the lashes are great, they are very soft and aren't shiny or plastic looking like some lashes can be. However, the band on these lashes is SUPER thick. My eyes are a bit small and slanted and these lashes would not bend to my eye shape. They kept lifting in the corners no matter how I trimmed them. I got fed up that time around, but saved them for another day. I tried again, only this time I cut them into pieces and glued the pieces on individually. The effect was nice, but they were pretty heavy and rather uncomfortable. Gluing them on like that was timely and also made reuse a bit difficult. I used the False Lash Mascara which is a formula made to blend your lashes with the false ones for a more natural look. It was coating my lashes and the false once nicely until I got too close to my water line and got some in my eye. Excuse my language, but HOLY S*** it burnt the hell out of my eye! If I feel adventurous I may use it again with a steadier hand, but maybe not. This mascara at full price is $19. The eyeliner is great, I love the travel sizes for when I can only bring essentials and who doesn't need black eye liner? I believe this kit originally sold for $19 and I bought it for $5. All in all, this kit was not for me, but at $5 it wasn't a big deal. This lash kit is no longer available through Urban Decay's website.
 discontinuing some products, one of these being the Urban Glow skin highlighter. Normally I use Smashbox Artificial Light in Flash which is a peachy, iridescent pink tone in a liquid formula but at $24 a bottle and money being a bit tight I had to find a cheaper alternative. I was pretty happy when I came across this on Hautelook for $6 (normally it is $24) and couldn't wait to give it a try. I bought the shade Moonshine, which like Flash is an iridescent pink but isn't as peachy as Flash is. It has a bit more white pearl to it. It comes in a cream cake and liquefies on touch from your body heat. I dab a few dots on my cheek bones and blend to add a bit of glow to my face. It has a nice texture and blends well without being overly shimmery. I like this product and would use it again if it weren't being discontinued. This product is still available on Urban Decay's website but only in the shade Wicked, which is a pinky shimmery shade.
  I was also excited to come across a five pencil set of UD's 24/7 shadow crayons. These are jumbo crayons in shades of your favorite UD shadows. They are a quick precise way to apply shadow and these can also be used for a base for other shadows. I already had a few full sized crayons ($19 each) and enjoy them so I figured five small crayons for $9 (Orig. $32) was a killer deal! It came with Sin (champagne shimmer, one of my fave shades), Clash (shocking bright blue), Juju (med. beige shimmer), Rehab (dark brown shimmer) and Delinquent (dark purple with glitter). I already owned a full size Delinquent and enjoy the shade so an extra mini was a plus. Sin, Rehab and Juju are great for a natural daytime look, while Clash and Delinquent are perfect for a night out on the town. These have a creamy texture and are pretty blendable, however they set rather quickly so you might want to be quick with your blend. The brush that works best for this is UD's 24/7 Shadow Pencil brush, a small dense brush with a tapered tip. This kit was a steal and I would purchase more of these crayons in their full size.
  I also picked up a 24/7 Concealer Pencil for $5, normally priced at $18. The only shade left was CIA, which is rather light but I can make it work. Normally I don't use heavy concealer around the eyes because it can settle into fine lines making even young eyes look older. However, after a stressful night with some redness and swelling, this did a pretty good job at covering these imperfections (after treating the swelling with cool teabags). I would prefer a tone closer to my own skin tone, but after setting this with powder it works. I wouldn't purchase it at full price simply because I do not use it enough. One thing I'm a bit confused about.... the pencil is plastic instead of wood. The bottom does not twist and I have no idea how you are supposed to get the rest of the product out!!! >..<